วันจันทร์ที่ 18 ธันวาคม พ.ศ. 2560

Google Assistant with Raspberry Pi


Google Assistant with Raspberry Pi

What is Google Assistant?

Google Assistant is Google’s voice assistant, which grew out of Google Now, and is available on a range of recent Android devices and now the iPhone

You can use Google Assistant to trigger apps and devices, ask all kinds of questions, make plans, and carry out a variety of useful tasks. If you’re new to the voice assistant, it may be difficult to figure out just how it works. Lucky for you, we can help! If you’re currently wondering, “what is Google Assistant anyway?” or “how can I use all this stuff with OK Google?” then read on to get started.

So,we 'll use Google Assistant on Raspberry Pi.

Hardware

1. Raspberry Pi Board model 3B and accessories
2. Speaker and Amplifier with Speaker
3. USB Microphone


Set Google Assistant API

Open Browser in Pi and go to: https://console.cloud.google.com/cloud-resource-manager

Create Project


New Project
Add your Project name. then Create.


Dashboard
Your Project detail.


Enable API
Go to API  ( APIs & services ) then Dashboard


Then ENABLE APIs and Services


Search "google assistant"


Click ENABLE


Create credentials


Go to OAuth consent screen


Then Download your credential id. ( JSON File )
We will use this file on Raspberry pi.
Then copy this file to raspberry pi.


How to Setup on Raspberry Pi

Install python virtual environment


$  sudo apt-get install python3-dev python3-venv


Download Dependencies

$  sudo apt-get install portaudio19-dev libffi-dev libssl-dev


Setup Python3

$  python3 -m venv env
$  env/bin/pip install setuptools --upgrade


set the virtual environment

$  source env/bin/activate 


Install Google Assistant SDK

$  python -m pip install google-assistant-sdk[samples]


Updated SDK for newest version

$  pip install --upgrade google-auth-oauthlib[tool]


Setup Google Assistant SDK with Credentials

$  google-oauthlib-tool --client-secrets /home/pi/Downloads/client_secret_XXXXX.json --scope https://www.googleapis.com/auth/assistant-sdk-prototype --save --headless

Need your credential file form Credential Setup page.
Then you have link to Google Permission Page


Run Google Assistant

$  googlesamples-assistant-pushtotalk


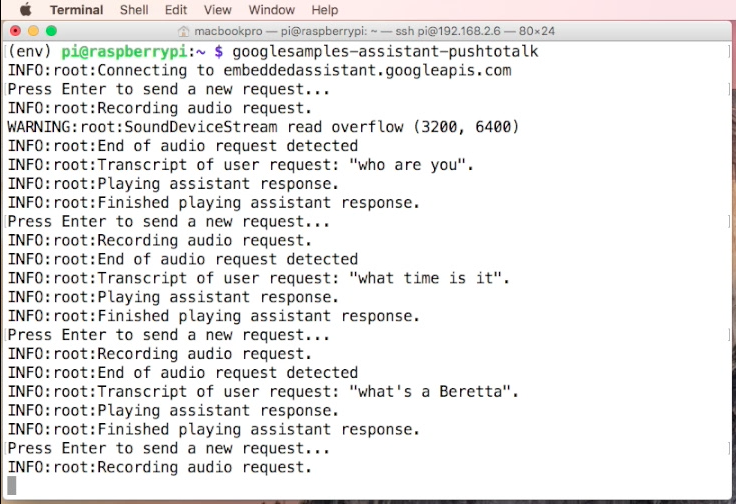
Enjoy your Google Assistant on Raspberry Pi.

see on Youtube

Reference

https://www.novaspirit.com/17SSm

https://www.raspberrypi.org/forums/viewtopic.php?t=188958

https://www.hackster.io/Salmanfarisvp/googlepi-google-assistant-on-raspberry-pi-9f3677


My Website
email : info@softpowergroup.net  ,amphancm@gmail.com  Tel .+6681-6452400

Android and Arduino IoT


LINE : adunfong
FaceBook : https://www.facebook.com/adun.nantakaew
email: amphancm@gmail.com

วันศุกร์ที่ 15 ธันวาคม พ.ศ. 2560

Raspberry Pi IoT with Firebase Realtime Database


Raspberry Pi IoT with Firebase 


What is Firebase?

Firebase is Backend as a Service ( BaaS ) by Google.
Firebase gives you many tools to develop high-quality apps, grow your user base, and earn more money. We cover the essentials so you can monetize your business and focus on your users.

In This Project. We are focus on Realtime Database first.


Real Time Database

The Firebase Realtime Database is a cloud-hosted NoSQL database that lets you store and sync data between your users in realtime.

Updated data syncs across connected devices in milliseconds, and data remains available if your app goes offline, providing a great user experience regardless of network connectivity.


Firebase Console

Go to Console


Add New Project


Add Project Name


Menu Database


Change Rules 

// These rules require authentication
{
  "rules": {
    ".read": "auth != null",
    ".write": "auth != null"
  }
}

Change to this
Warning !!!  This is for test first. Anyone can read and write your database without authentication.

// These rules are not require authentication
{
  "rules": {
    ".read": true ,
    ".write": true
  }
}


Your Realtime Database is ready to use.
and show URL Link for your firebase realtime database. ( https://raspberrypi-3d41f.firebaseio.com/ )


Now Make Raspberry Pi sent data to Firebase Realtime Database


Wiring Diagram

Hardware


  • Raspberry Pi Board ( we use Raspberry Pi3 board ) + Accessories
  • DHT11 Temperature and Humidity Sensor with Resistor 4.7 K Ohm ( or DHTxx )

Install DHT Python Library

$  git clone https://github.com/adafruit/Adafruit_Python_DHT.git
$  cd Adafruit_Python_DHT
$  sudo apt-get install build-essential python-dev python-openssl
$  sudo python setup.py install
Install Firebase Python Library

  
$  sudo pip install requests==1.1.0
$  sudo pip install python-firebase
  

Python Source Code on Github

https://github.com/amphancm/Raspberrypi_Firebase
Code
dht-firebase.py ( without OLED Display)
dht-firebase-oled.py ( need OLED display )
and Minecraftia.ttf is font for OLED.


Reference

https://pypi.python.org/pypi/python-firebase/1.2


My Website
email : info@softpowergroup.net  ,amphancm@gmail.com  Tel .+6681-6452400

Android and Arduino IoT


LINE : adunfong
FaceBook : https://www.facebook.com/adun.nantakaew
email: amphancm@gmail.com

วันอังคารที่ 5 ธันวาคม พ.ศ. 2560

Raspberry Pi vs Asus Tinker Board


Raspberry Pi vs Asus Tinker Board

The Raspberry Pi has a competitor by Asus Tinker Board.

Asus Tinker board is a powerful board highly compatible with current solution and peripherals available in the market and it combines low power consumption with high performance platform.
Asus Tinker board has a quad-core 1.8GHz Rockchip processor, compared to the quad-core 1.2GHz Broadcom processor in the Raspberry Pi 3. It also has 2GB of memory, double that of the Pi 3.

One online benchmark claims the Tinker Board is almost two times faster than the Pi 3 in Geekbench, with Asus’ offering racking up a score of 3925 compared to the Pi’s 2092, as well as being faster when reading from and writing to storage.

While the Pi 3’s processor is based on a 64-bit architecture, compared to the 32-bit based architecture in the Tinker Board, the Tinker Board’s ARM Cortex A17-based chipset has been shown to outperform the Pi 3’s ARM Cortex A53-based chipset in certain tests.
Asus’ offering provides an alternative to Pi users while they wait for a performance upgrade, as the Pi’s co-creator Eben Upton has warned it will likely be at least 2018 before a new Raspberry Pi board is released. He also cautioned against expecting the Pi 3 to get a memory bump in the near future.

The Tinker Board also outstrips the Pi’s specs by supporting 4k video, Gigabit Ethernet and 192kHz/24-bit audio.


Comparison


Raspberry Pi 3 Model B ASUS Tinker Board
Product Launch 2016 Feb 2017 Jan
Broadcom BCM2837 Rockchip RK3288 
CPU Cortex-A53 Cortex-A17
ARMv8 Quad-Core 1.2 GHz ARMv7 Quad-Core 1.8 GHz
RAM 1 GB LPDDR2 2 GB LPDDR3
GPU Broadcom Video IV 400 MHz  Mali T764 600 MHz
Display HDMI , HD resolution HDMI , H.264 4K decode capability
WiFi 802.11b/g/n  802.11b/g/n , swappable antenna
NIC 100 M LAN Gb LAN
Bluetooth 4.1 LE 4.0 EDR
SDIO 2.0 3.0
Official OS Linux - Debian Linux - Debian / KODI
Prices ( amazon )
34.5 USD.
54.99 USD.

Benchmark


Reference 

วันเสาร์ที่ 2 ธันวาคม พ.ศ. 2560

Raspberry Pi IoT Performance Monitor with ThingSpeak


Raspberry Pi IoT Performance Monitor with ThingSpeak

This project you can monitor raspberry pi or other embedded linux or Single Board Computer ( SBC ) such as CPU Temperature , CPU %,Memory and Disk Usage on ThingSpeak Cloud IoT service.
Code is python.

System Diagram


What is ThingSpeak.com?

ThingSpeak  is an Internet of Things (IoT) platform that lets you collect and store sensor data in the cloud and develop IoT applications. The ThingSpeak™ IoT platform provides apps that let you analyze and visualize your data in MATLAB®, and then act on the data. Sensor data can be sent to ThingSpeak from Arduino®, Raspberry Pi™, BeagleBone Black, and other hardware.
https://thingspeak.com/

Source Code and Library ( To install on Raspberry Pi )

PSUtil Python Library 
PSUtil is a cross-platform library for retrieving information on running processes and system utilization (CPU, memory, disks, network) in Python.

Run Command

sudo apt-get install build-essential python-dev python-pip
sudo pip install psutil

Python code on Github

https://github.com/amphancm/RaspberryPi_ThingSpeak


EDIT Code for your own KEY


#!/usr/bin/env python
import psutil
import httplib, urllib
import time
import os,sys

from PIL import Image
from PIL import ImageDraw
from PIL import ImageFont

disk = os.statvfs("/")
used = disk.f_bsize * (disk.f_blocks - disk.f_bavail)

sleep = 30            # how many seconds to sleep between posts to the channel
key = 'ZG8WMLWF4PBQQVFB'  # Write Key Thingspeak channel to update

# THIS IS MY KEY for ThingSpeak Channel 238835
# YOUR MUST CHANGE to YOUR WRITE KEY


Run Python code

python performance.py

Result on ThingSpeak

Thingspeak Monitor Example  https://thingspeak.com/channels/238835


Option Add OLED Display


Wiring Diagram
You must install OLED Adafriut Library SSD1306
See this Raspberry Pi connect OLED I2C Display and use code performance_oled.py and Font.


Reference

http://www.iotleague.com/d-i-y-how-to-upload-your-raspberry-pi-sensor-data-to-thingspeak-website

https://thingspeak.com/


My Website

email : info@softpowergroup.net  , amphancm@gmail.com  Tel .6681-6452400 

Android Arduino IoT