How to make GUIs (Graphical User Interface) on Raspberry Pi in Python.
In Python, the steps to get started with GUI programming are not terribly complex, but they do require the user to begin making some choices. By its nature as a general purpose programming language with interpreters available across every common operating system, Python has to be fairly agnostic as to the choices it presents for creating graphical user interfaces.
Fortunately, there are many options available for programmers looking to create an easy way for users to interact with their programs. Bindings exist for several UI frameworks on a variety of platforms.
Tkinter, GTK, QT (PySide and PyQT), wxPython, Kivy, thrust, …?
Tkinter
Tkinter is the standard GUI library for Python. Python when combined with Tkinter provides a fast and easy way to create GUI applications. Tkinter provides a powerful object-oriented interface to the Tk GUI toolkit.
If there were a single package which might be called the "standard" GUI toolkit for Python, it would be Tkinter. Tkinter is a wrapper around Tcl/Tk, a popular graphical interface and language pairing first popularized in the early 90s. The advantage of choosing Tkinter is the vast number of resources, including books and code samples, as well as a large community of users who may be able to help you out if you have questions. Simple examples are easy to get started with and fairly human-readable.
Tkinter is available under the Python license, on top of the BSD license of Tcl/Tk.
WxPython
WxPython brings the wxWidgets cross-platform GUI library from its native C++ to Python. WxPython is a slightly more modern approach to, which looks a little more native than Tkinter across different operating systems as it does not attempt to create its own set of widgets (although these can be themed to look much like native components). It's fairly easy to get started with as well, and has a growing developer community. You may need to bundle wxPython with your applications, as it is not automatically installed with Python.
Working with Python 3? Check out wxPython's Project Phoenix, a rewrite of the project which will work with the newest version of Python.
PyQt implements the popular Qt library, and so if you are familiar with Qt development in another language, perhaps from developing native applications for KDE or another Qt-using desktop environment, you may already be familiar with Qt. This opens up the possibility of developing applications in Python which have a familiar look and feel across many platforms, while taking advantage of the tools and knowledge of the large Qt community.
PyQt is dual licensed under both a commercial and GPL license, not unlike Qt project itself, and the primary company supporting PyQt offers a license FAQ to help understand what this means for your application. For another option to use the Qt libraries with Python, consider checking out PySide, which is available under the LPGL.
ElectronJS
Electron is a framework for creating native applications with web technologies like JavaScript, HTML, and CSS. It takes care of the hard parts so you can focus on the core of your application.
Raspberry Pi connect Fingerprint Reader Optical fingerprint readers offer large capture areas, excellent image quality and rapid capture speed all in a compact, durable case. Our optical readers with a silicone membrane provide superior image capture performance for a wide range of skin conditions. This translates to easy, efficient and high-quality image capture – which impact technology acceptance and performance – making our U.are.U readers the preferred biometric solution for a range of commercial applications.
Digital Persona U.are.U 4500 Fingerprint Reader
The U.are.U 4500 Fingerprint Reader is a USB peripheral perfect for individual desk
top users, as well as multiple users in shared environments. Its compact design
conserves desk space in enterprises, and its professional, modern appearance
looks elegant in point-of-sale environments. The U.are.U 4500 Reader utilizes optical
fingerprint scanning technology to achieve excellent image quality, a large capture area
and superior reliability. A silicone coating allows it to read a wide range of fingerprints
accurately and rapidly regardless of placement angle. The high-quality metal casing
resists unintentional movement.
To use, simply place a finger on the reader window and the reader quickly and
automatically captures and encrypts the fingerprint image before sending it to the
DigitalPersona® FingerJetTM biometric engine for verification. For superior user
feedback, a red “flash” indicates that a fingerprint image has been captured.
The U.are.U 4500 Fingerprint Reader is designed for use with a full range of
CrossmatchTM software including our authentication solutions, as well as most of our
U.are.U Software Development Kits. Whether you are an enterprise customer or a
system integrator, Crossmatch’s biometric identity verification solutions provide a natural
extension to your security system and applications.
KEY SPECIFICATIONS
• Pixel resolution: 512 dpi
(average x, y over the scan area)
• Scan capture area: 14.6 mm
(nom. width at center) 18.1 mm
(nom. length)
• 8-bit grayscale (256 levels of gray)
• Reader size (approximate):
65 mm x 36 mm x 15.56 mm
• Compatible with USB 1.0,
1.1 and 2.0 (Full Speed)
specifications
The fprint project aims to plug a gap in the Linux desktop: support for consumer fingerprint reader devices.

Previously, Linux support for such devices has been scattered amongst different projects (many incomplete) and inconsistent in that application developers would have to implement support for each type of fingerprint reader separately. For more information on where we came from, see ?/Project history.


We're trying to change that by providing a central system to support all the fingerprint readers we can get our hands on. The software is open source and in the long term we're shooting for adoption by distributions, integration into common desktop environments, etc.

Software to demonstrate libfprint's capabilities.
Currently in early stages.
Written in C. Requires libfprint and GTK+.
Licensed under the GPL version 2
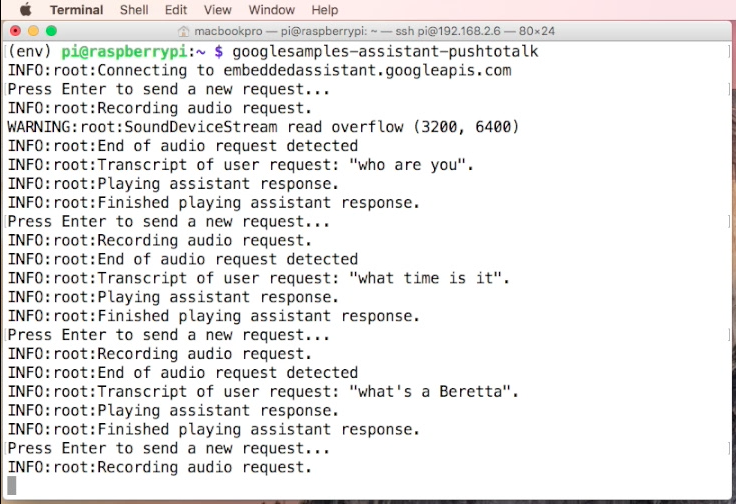
Google Assistant is Google’s voice assistant, which grew out of Google Now, and is available on a range of recent Android devices and now the iPhone. You can use Google Assistant to trigger apps and devices, ask all kinds of questions, make plans, and carry out a variety of useful tasks. If you’re new to the voice assistant, it may be difficult to figure out just how it works. Lucky for you, we can help! If you’re currently wondering, “what is Google Assistant anyway?” or “how can I use all this stuff with OK Google?” then read on to get started.
So,we 'll use Google Assistant on Raspberry Pi.
Hardware
1. Raspberry Pi Board model 3B and accessories
2. Speaker and Amplifier with Speaker
3. USB Microphone
Firebase is Backend as a Service ( BaaS ) by Google. Firebase gives you many tools to develop high-quality apps, grow your user base, and earn more money. We cover the essentials so you can monetize your business and focus on your users. In This Project. We are focus on Realtime Database first.
Real Time Database
The Firebase Realtime Database is a cloud-hosted NoSQL database that lets you store and sync data between your users in realtime. Updated data syncs across connected devices in milliseconds, and data remains available if your app goes offline, providing a great user experience regardless of network connectivity.
Firebase Console Go to Console
Add New Project
Add Project Name
Menu Database
Change Rules
// These rules require authentication{"rules":{".read":"auth != null",".write":"auth != null"}}
Change to this
Warning !!! This is for test first. Anyone can read and write your database without authentication.
// These rules are not require authentication{
"rules": {
".read": true ,
".write": true
}
}
Your Realtime Database is ready to use.
and show URL Link for your firebase realtime database. ( https://raspberrypi-3d41f.firebaseio.com/ )
Now Make Raspberry Pi sent data to Firebase Realtime Database
Wiring Diagram
Hardware
Raspberry Pi Board ( we use Raspberry Pi3 board ) + Accessories
DHT11 Temperature and Humidity Sensor with Resistor 4.7 K Ohm ( or DHTxx )
I2C OLED Display ( 128 x 64 0.96' SSD1306 chip ) for Option ( Install OLED Library )


